


Carl's Place DIY Golf Simulator Enclosure Kit (C-Series)
Regular price
$2,860.11 CAD
Regular price
Sale
$3,110.11 CAD
Sale price
$2,860.11 CAD
INCLUDES Free Shipping to Contiguous USA!
*where applicable; shown at checkout
*where applicable; shown at checkout
- Estimated Lead Time: 2 to 4 Weeks*
- Ships From: USA** */** Mouseover or click here for full details
*Lead time is the period from when we receive payment (and after layout approval if order has applicable items) to the date the product is estimated to ship out. Par2Pro will make every effort to ensure you receive your order as fast and cost efficient as possible.
**International shipments may be subject to customs brokerage, local import duties, and other charges, which are the sole responsibility of the addressee, as are any taxes levied by government authorities in the destination country.
Why Buy From Par2Pro?
✓ Satisfaction Guarantee
✓ Price Match Guarantee
✓ No Additional Tariffs (if shipping within the same country)
✓ Best Service & Support from In-House Specialists
✓ Par2Pro Tested and Approved
Click here for full details
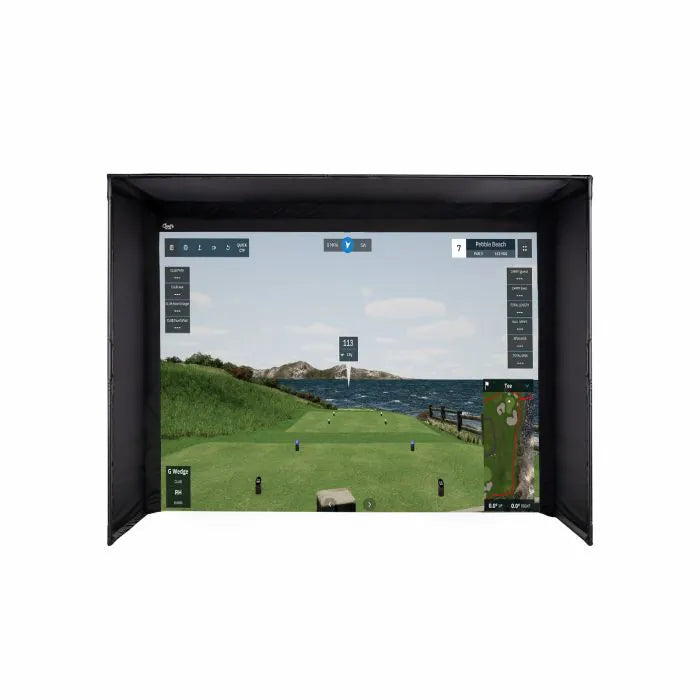
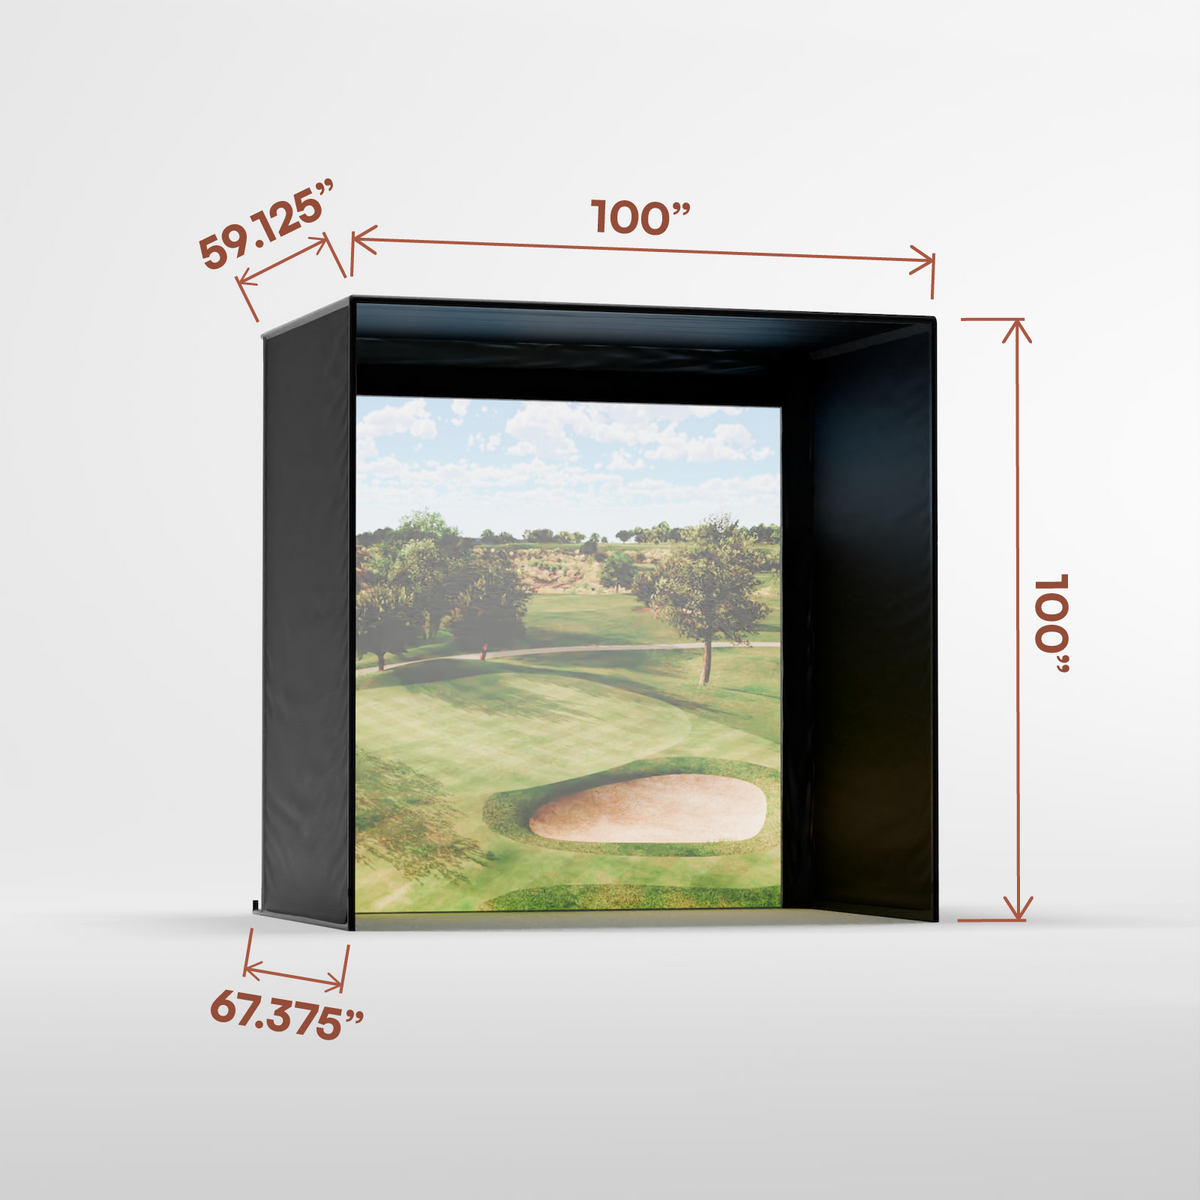
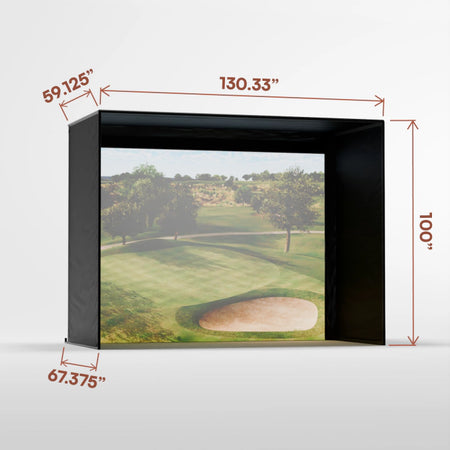
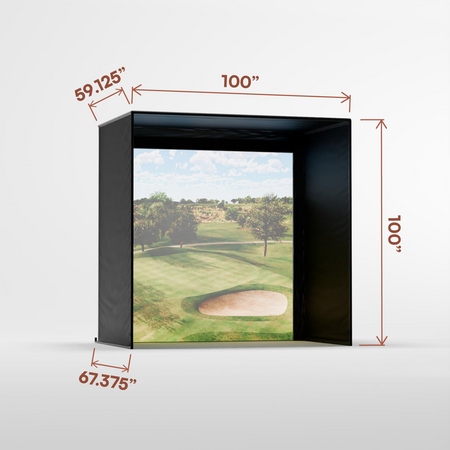
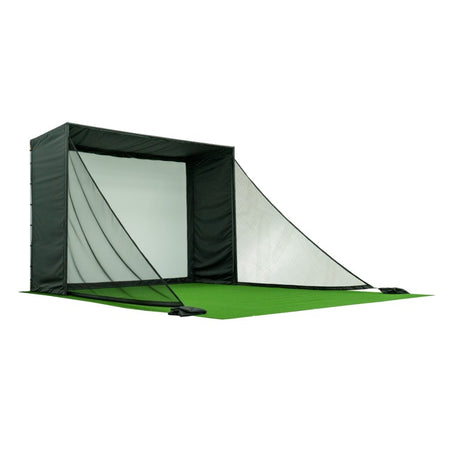
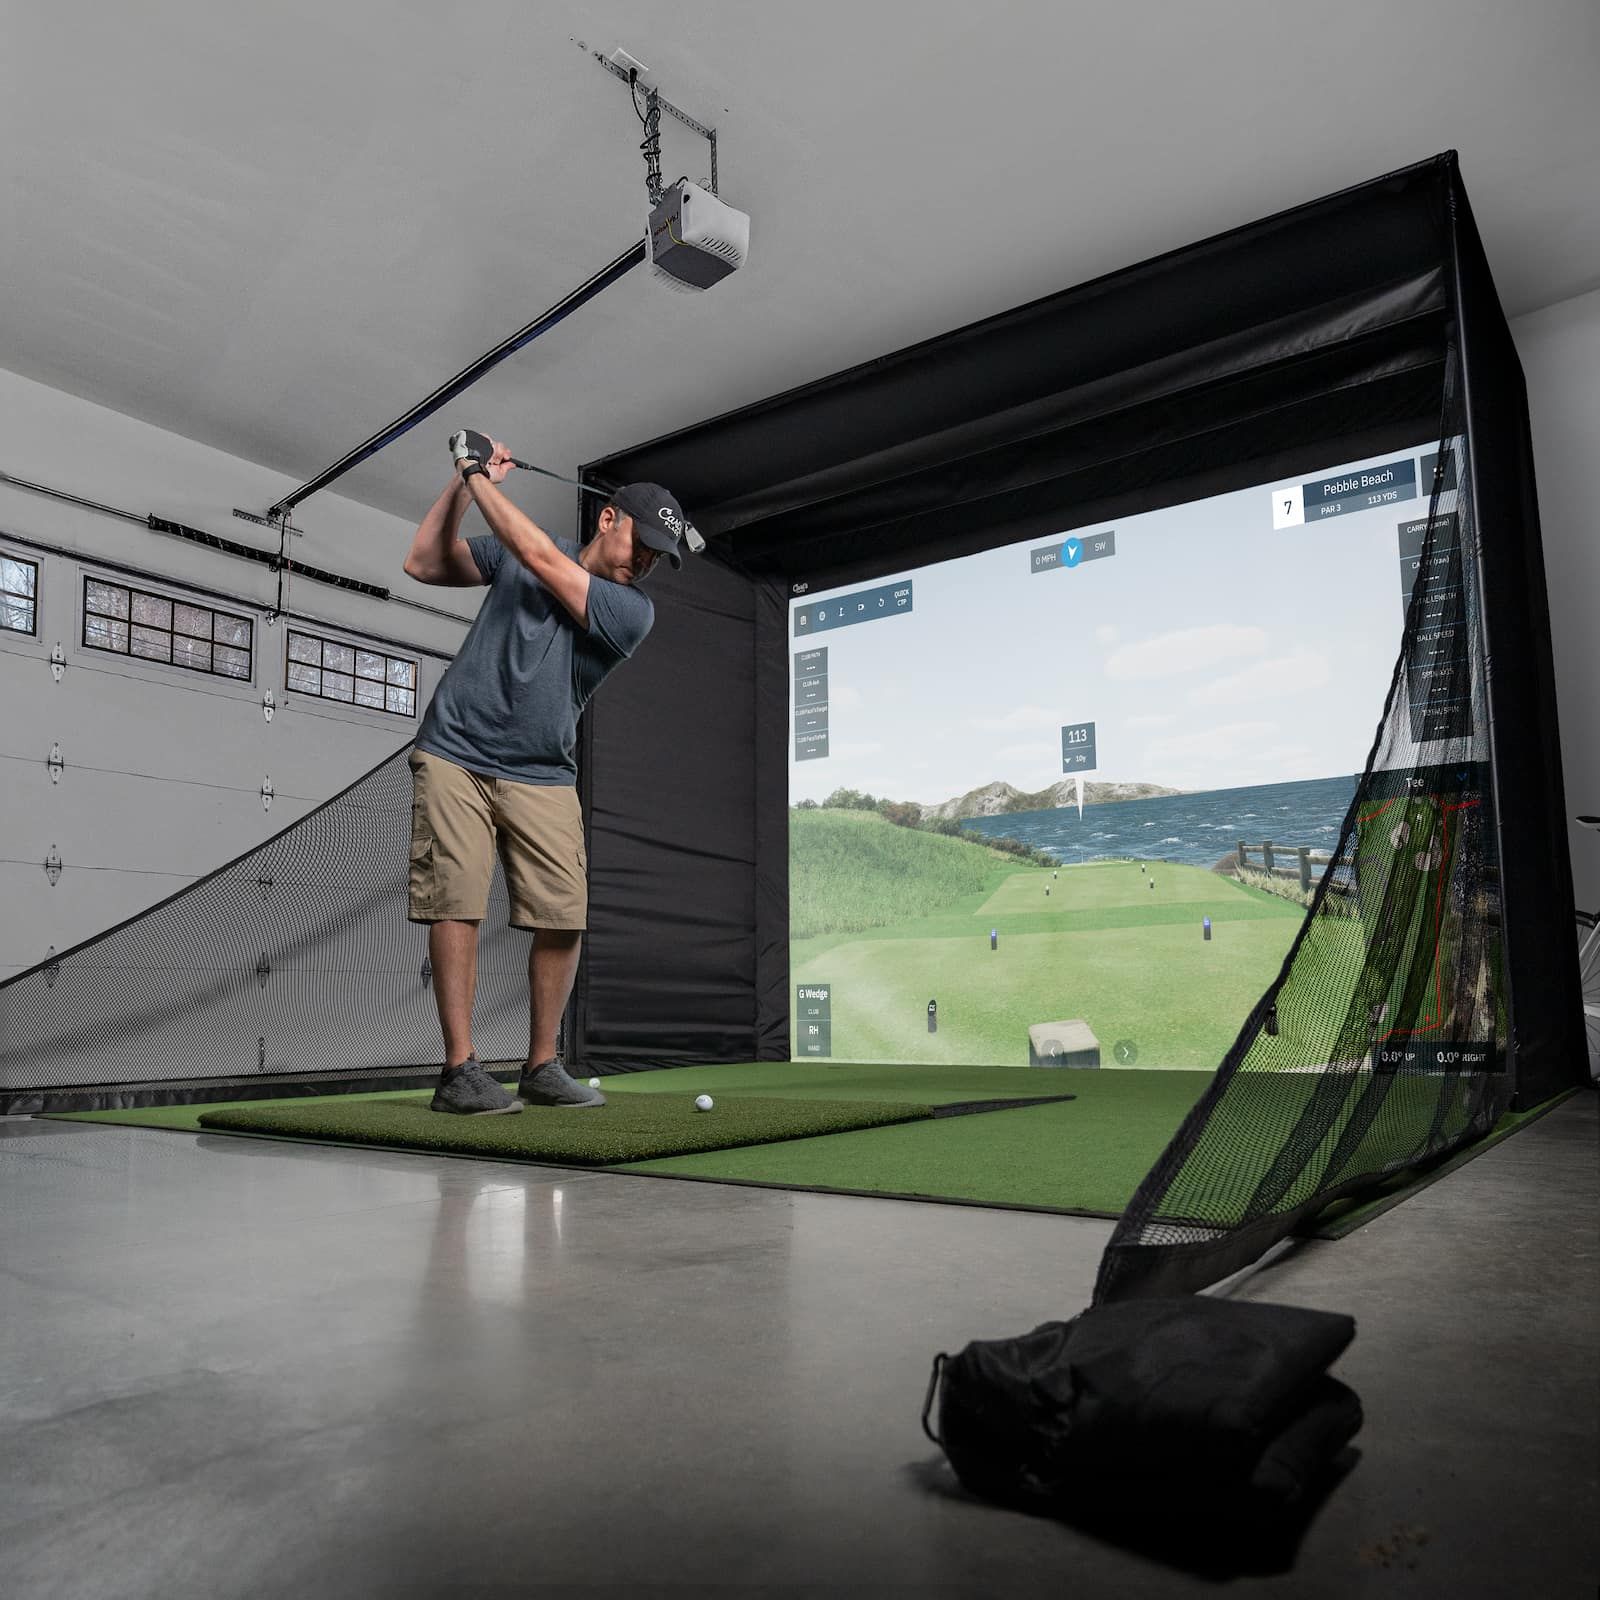
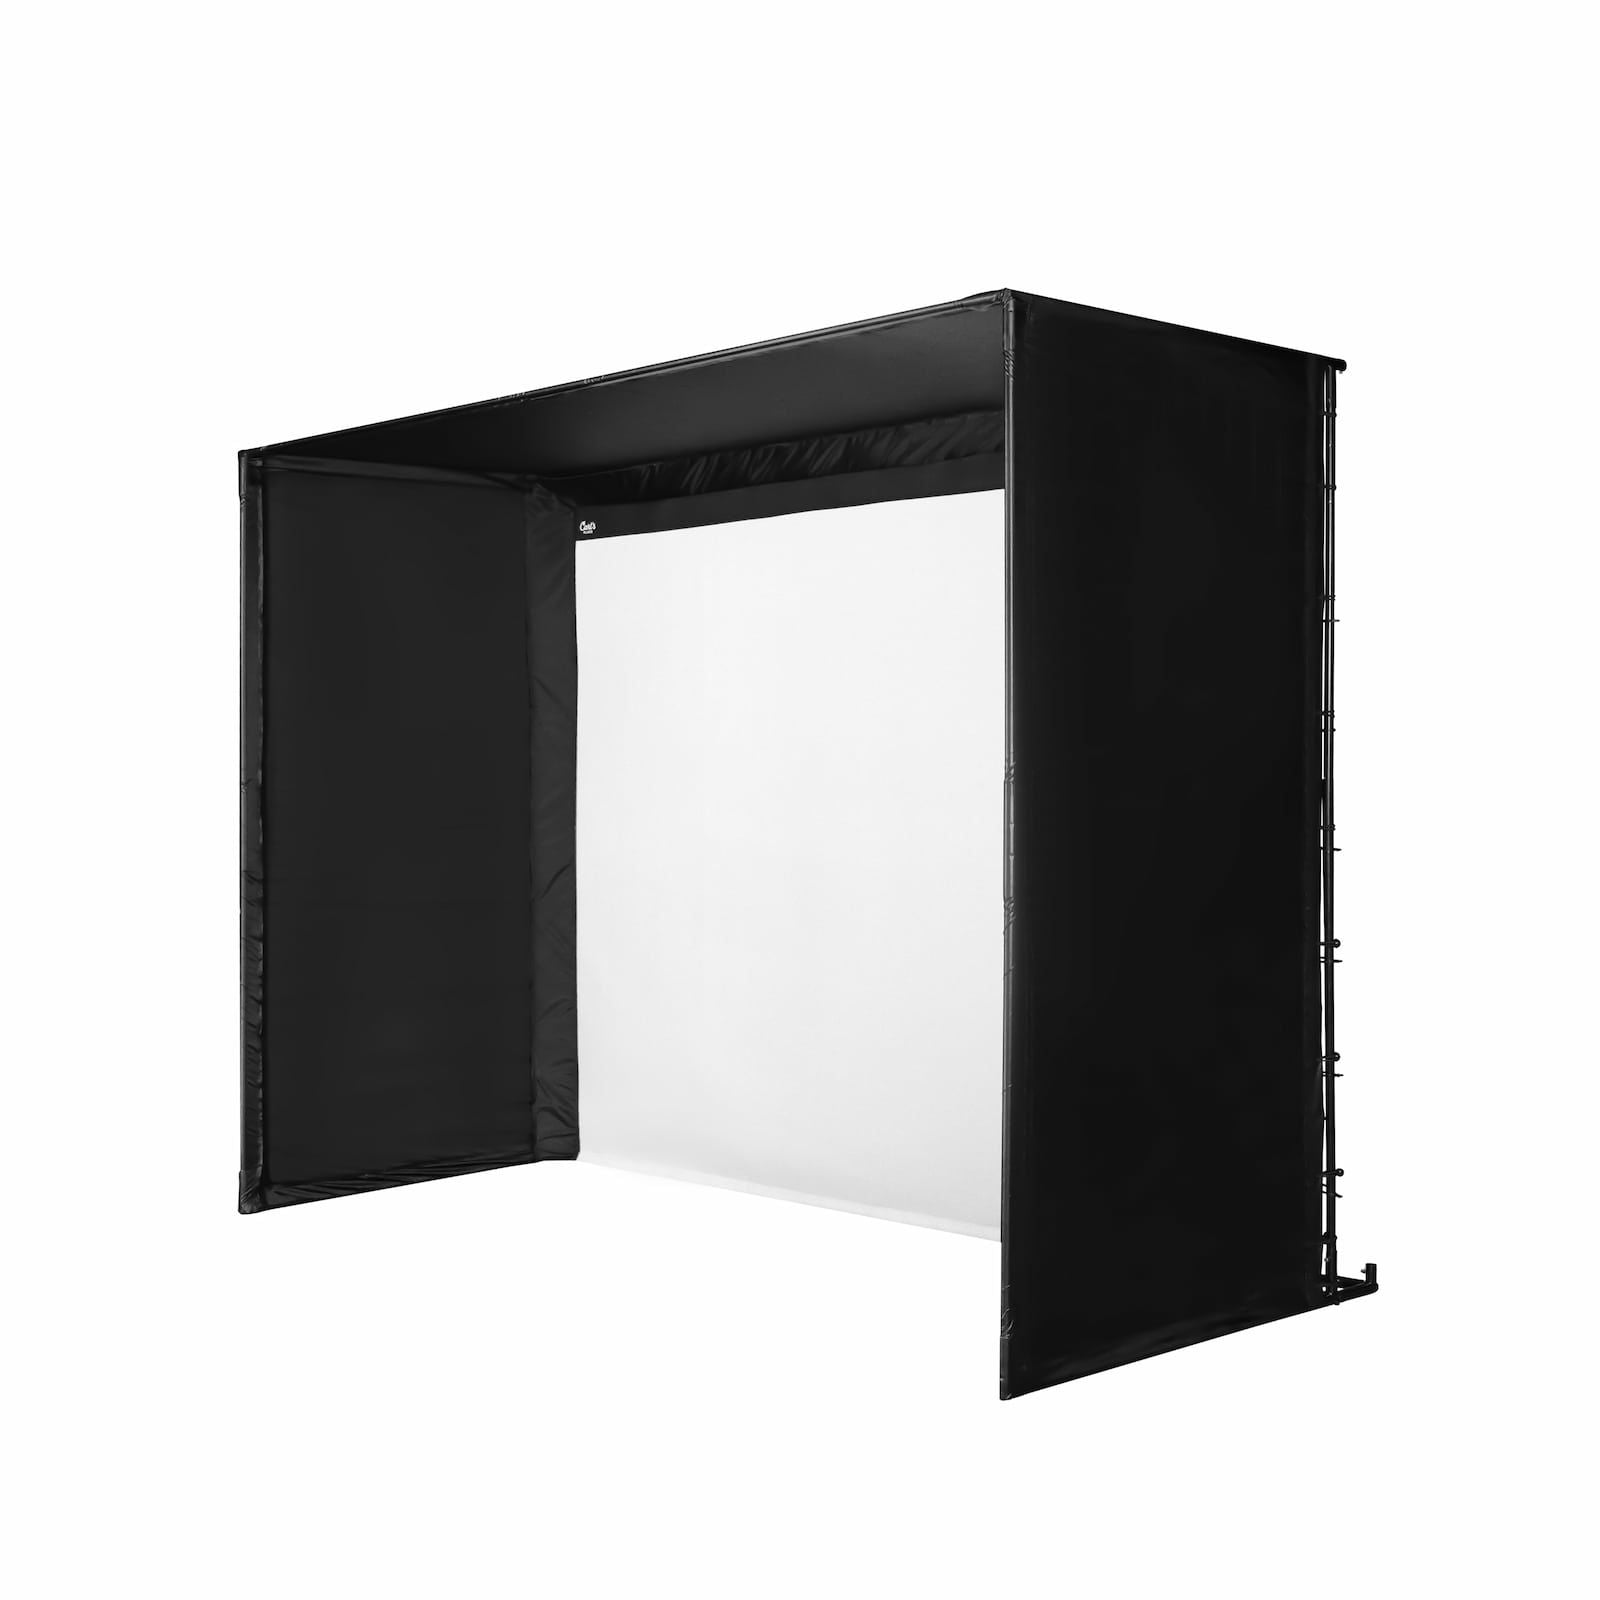
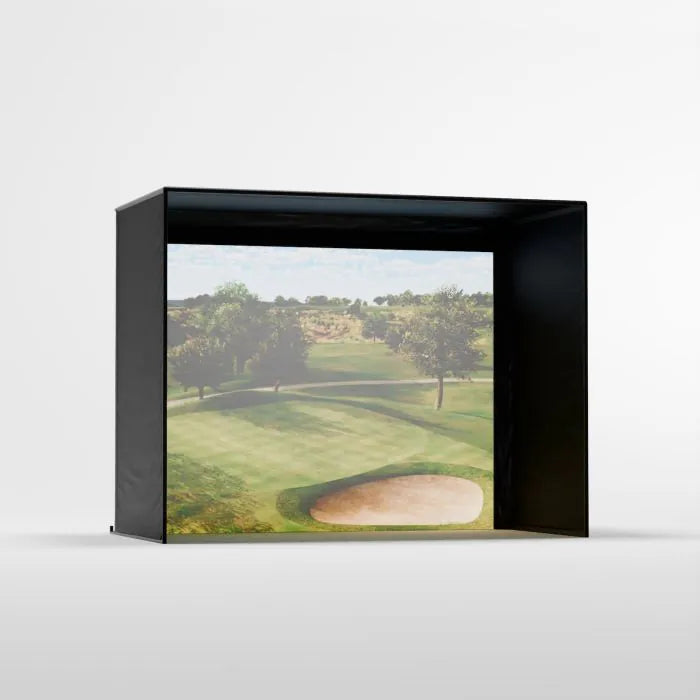
Get a seamless floor-to-turf image while practicing golf at home!
Carl's Place DIY Golf Simulator Enclosure Kits are crafted to bring the feel of professional golf right into your home. Includes our impact screens that let the image go all the way to the floor, durable nylon enclosure, and the fittings to build your frame. We’ll even tell you exactly what pipes you need or make it easy with our Pipe Framing Kit for a hassle-free, all-in-one solution.
With our High-Contrast Gray Premium Golf Screen, you’ll enjoy improved image contrast and clarity, especially in rooms with ambient lighting, for a more immersive visual experience.
Play Golf in Floor-to-Ceiling Borderless Visuals
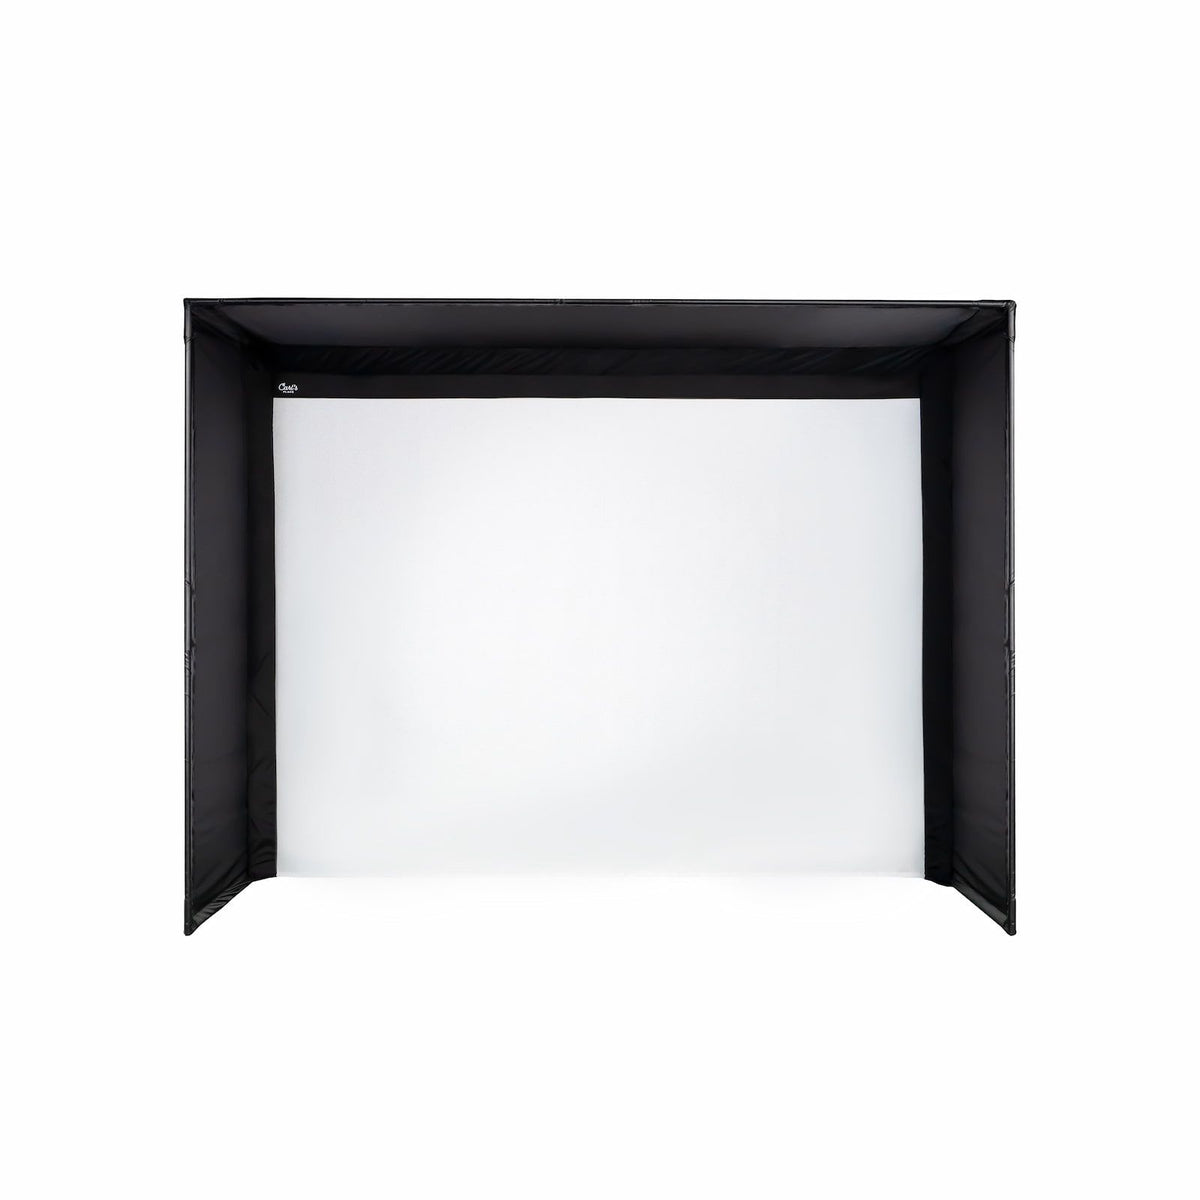
Immerse yourself in a seamless turf-to-screen experience with the cutting-edge design of our ingeniously crafted cabled screen, featuring a sleek borderless bottom.
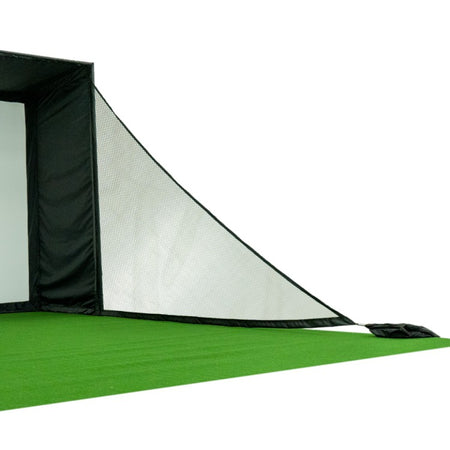
Feel at ease practicing golf at home thanks to our innovative golf impact screen system. It incorporates releasable zip ties and a bottom cable, effectively preventing any golf ball bounceback.
Building a Home Golf Simulator? You got this!
With our easy, do-it-yourself design, you can save thousands by building your own fully-loaded golf simulators! Created to help users with one of the trickiest parts of building a home golf simulator: building the enclosure itself.
Our DIY Enclosure is designed to be flexible and customizable, to perfectly fit your space.
Included:
-
Premium Impact Screen
- Par2Pro has chosen to only sell the Carl's enclosure with their Premium Screen material as we have found the value of the screen to be the best. It is engineered to create a bottomless edge that creates a picture-perfect floor-to-turf image with minimal bounce back.
-
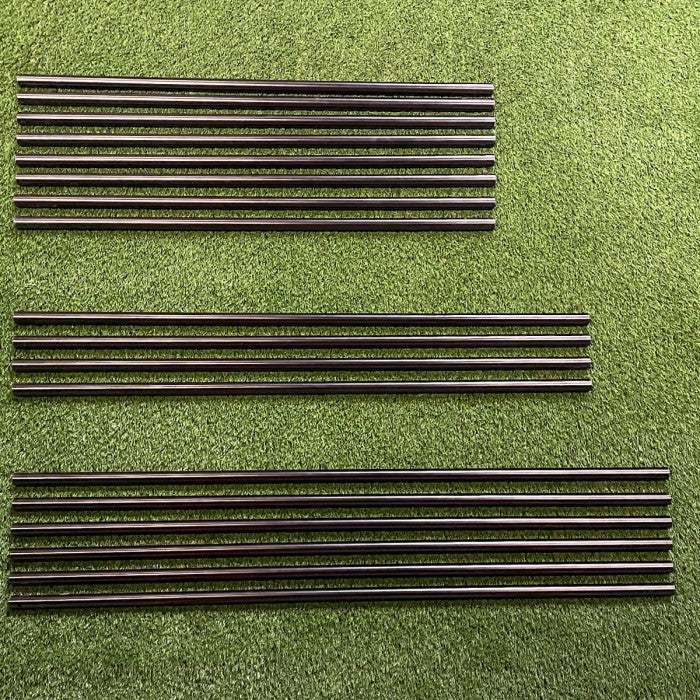
Pipe Framing Kit
- The Pipe Framing Kit is required to complete the assembly of your DIY enclosure. All Pipes and elbows are powder-coated EMT pipes that are pre-cut to the exact lengths required - no pipe cutting or hauling required! Fittings and corners allow for easy assembly.
-
Steel Fittings
- The DIY Golf Simulator Enclosure Kit includes the corner fittings you need to connect your pipes.
-
Zip Ties
- We include all the fasteners you need to secure your enclosure and screen. You'll get zip ties to secure your screen to the frame. We even give you extra so you find the perfect balance of tension for your specific swing style. Depending on how close you're hitting to the screen, ball speed, clubs used, and spin rates, you can adjust them all to find your sweet spot between tension and slack.
- We include all the fasteners you need to secure your enclosure and screen. You'll get zip ties to secure your screen to the frame. We even give you extra so you find the perfect balance of tension for your specific swing style. Depending on how close you're hitting to the screen, ball speed, clubs used, and spin rates, you can adjust them all to find your sweet spot between tension and slack.
Optional Accessories:
-
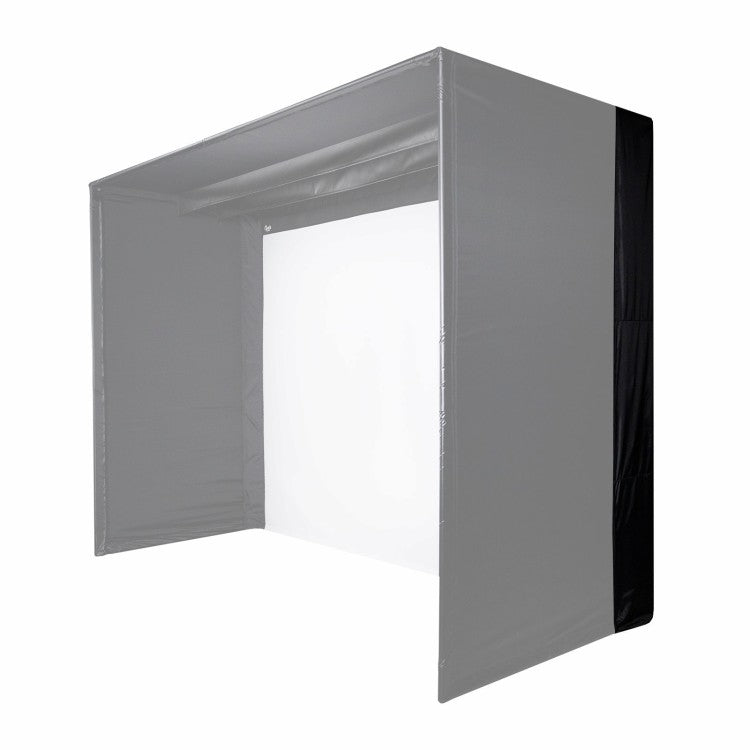
Back Cover Kit and Back Cover Pipe Kit (Back Cover & Pipe Kit)
- Get rid of any light leakage, both internally and externally, to achieve the utmost superior projected image quality while providing your enclosure with a polished and refined appearance. Just like our enclosure, you can add the pipes for the back cover with the Back Cover Pipe Kit, or we'll just tell you what size pipes you need to source and cut yourself.
-
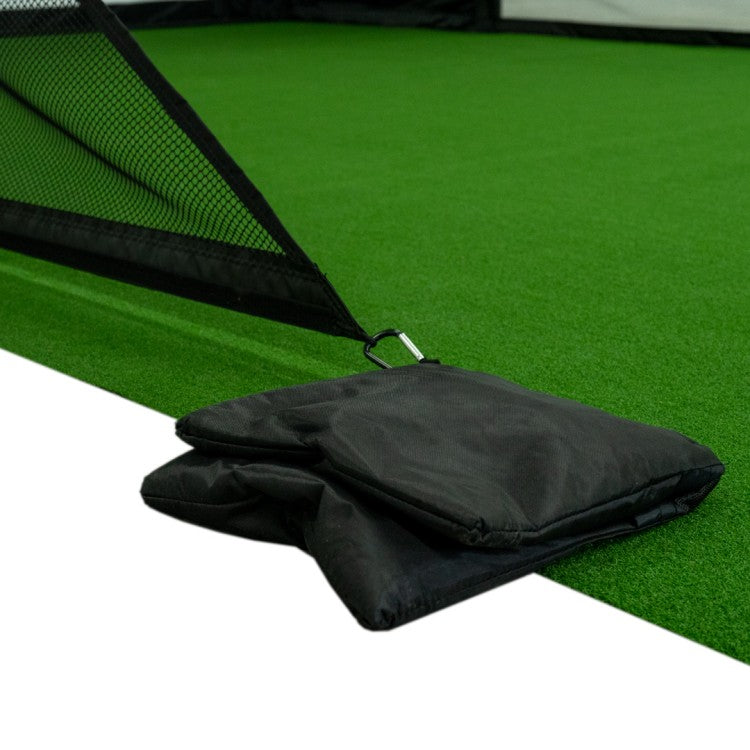
Net Wall Extensions
- Net wall extensions protect the walls of your enclosure without closing in your space. If errant balls are a concern, a set of golf hitting net extensions provides an additional barrier to keep your golf balls in the hitting area, not bouncing around your home. Simply attach onto the frame enclosure with hook and loop strips. A sandbag, at the bottom, holds it in place (fill not included). But, sometimes it's best to have a little extra protection. For that, we offer a few options for upgrades. Foam inserts fit snugly to provide additional padding in the corners of the frame.
How To:
FAQ:
Technical Information
What aspect ratio and size golf projection screen do I need?
Aspect ratio simply refers to the shape of the image being projected. When the ratio of the projector, image, and screen match the image fills the entire screen and you will not see black masking bars.
An aspect ratio of 4:3 has the shape of a CRT TV, and a 16:9 has the shape of a flat screen TV. The 4:3 is very common for golf simulators because it allows you to go taller, giving you more room to swing, without needing a wider room. If space allows the 16:9 is great for 4K and HD images, but be aware if you are tall or have limited room depth that this option may be too short for you to swing a golf club. The 16:10 is an aspect ratio mostly used for computer displays and tablet computers. These days it’s somewhat uncommon for projection, but with some effort it should be possible to find a projector capable of this ratio.
For some customers, the projected image is secondary while the safety of the surrounding area is the priority. Selecting a size where the aspect ratio is non-standard, so that it fits your space, is also an option. Just be aware the image will not fill the entire screen if you are using it for projection and the black masking bars will be visible.
The 1:1 is a square and is not a standard aspect ratio for projectors, but may work if space is limited, although it increases the chances of seeing black bars and you will likely have to adjust the settings on your computer. Adjusting the settings on your computer may be difficult for most customers unless you are very technically savvy.
Care and Use Information
How far away should I stand from my impact screen?
For the safety of both the golfer and the screen, we recommend standing a minimum of 10-12 feet away from the screen.
Can I iron or steam a golf impact screen?
We do NOT recommend ironing your golf screen, simply because it is very easy to damage the screen. And we want your golf screen to last you a long, long time. With wrinkles and fold marks, the best thing is prevention. Unpack your new screen immediately, and if you need to store it, fold it very loosely. But if you're reading a section on ironing your golf screen, it's probably too late for prevention. Know that mounting your golf screen to a frame with tension and letting it relax for a couple of days will smooth out most wrinkles.
That being said...
We have heard of customers being successful in removing wrinkles and fold marks from their screens using a clothes iron. If you want to try this, do so only on the backside of the material and on a VERY LOW setting.
Can I wash my golf screen material?
Check out this article for all Carl's Place recommendations on 'How to Clean Your Golf Impact Screen'.
Are there safety concerns when using a golf simulator?
We want your indoor golf set up to be fun, help improve your game, and be safe for everyone.
- Make sure to follow the assembly manual
- Keep children, pets, and spectators out of swing range.
- Protect ceilings, walls, windows, cars & neighboring homes.
- Understand the Terms of Sale of using a Carl's Place product.
Do I need to use a golf hitting mat?
Golf hitting mats give you a nice cushy surface to stand and swing your golf club. They help protect your joints from any impact during your swing. They also let you have a more realistic golf practice when you can tee up the golf ball at the perfect height and swing freely.
When choosing a size for your golf mat consider the golfer's needs. A size of 4'x5' will let most golfers swing a driver with their heels comfortably on the edge of the mat. A larger size, 5'x7' or 4'x9', would be able to accommodate golfers with a wide stance or if you have friends over swinging either righty or lefty.
Golf Enclosure Information:
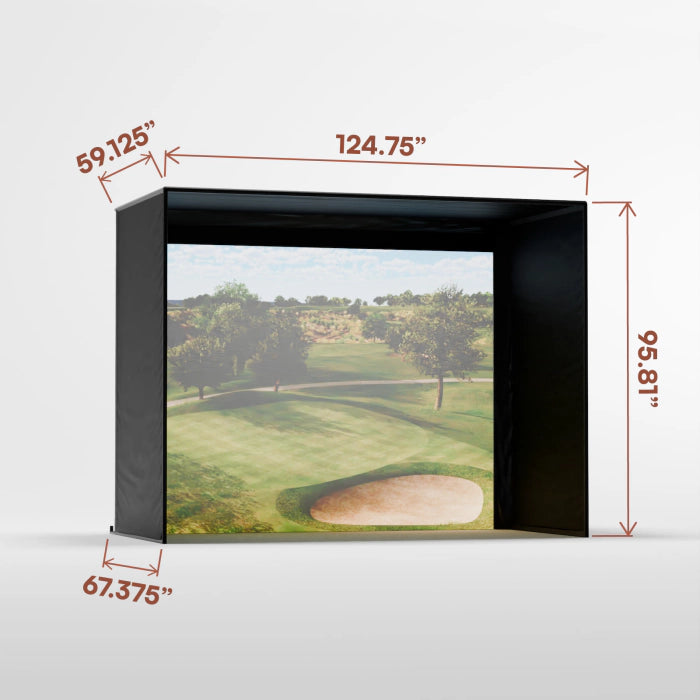
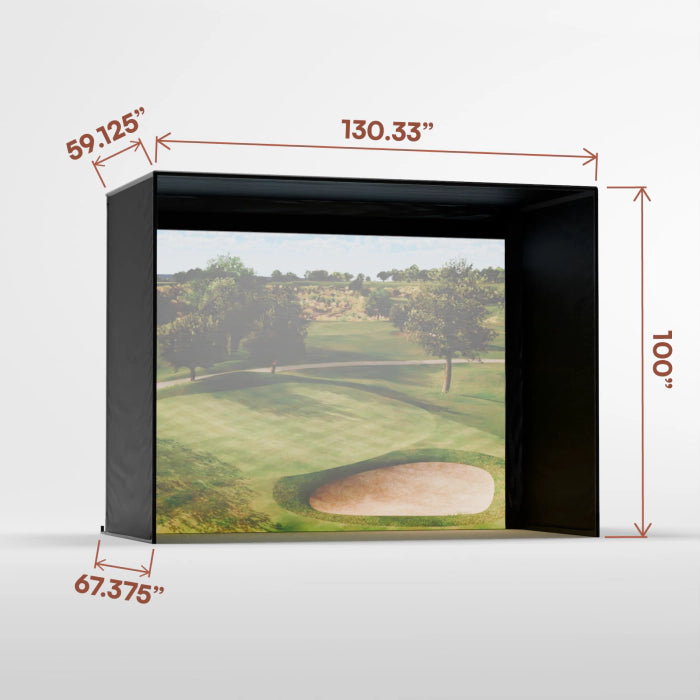
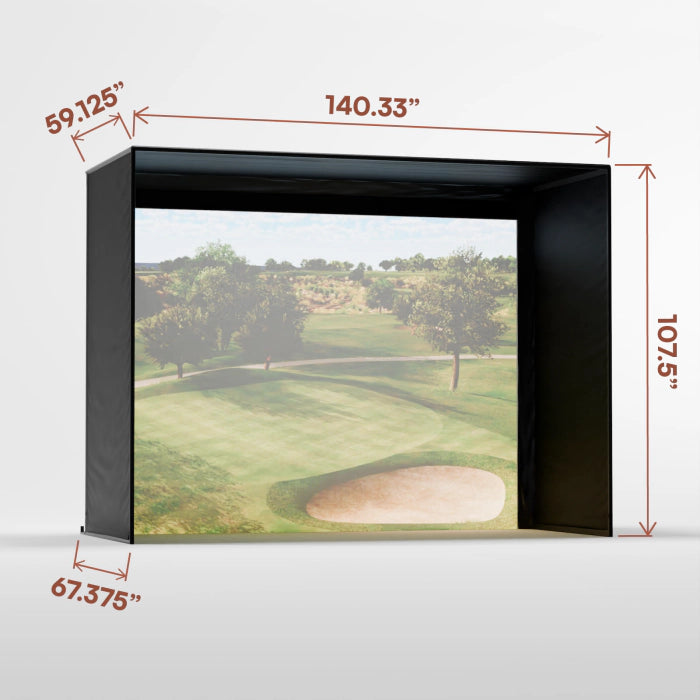
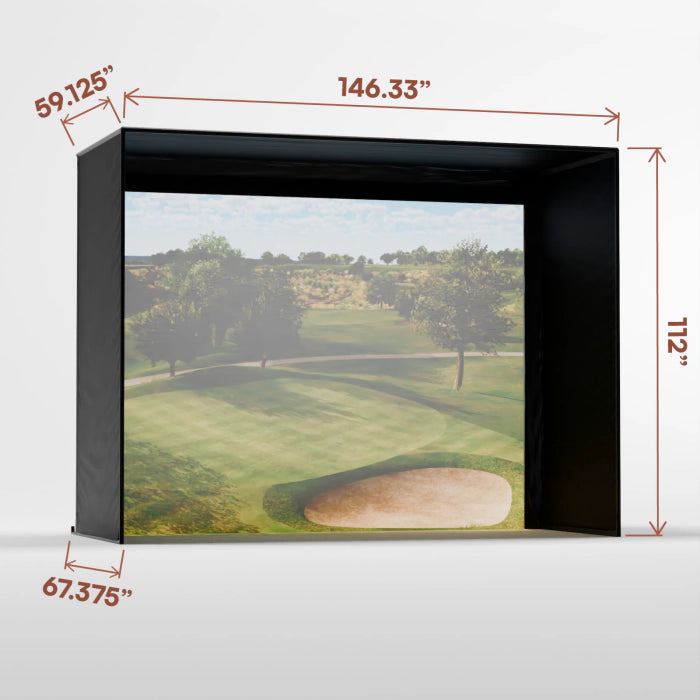
How much space do I need for the enclosure?
When measuring for a golf simulator, make sure you take into account:
- Buffer space: You don't want your golf simulator right up next to any walls. It can damage the wall and cause unwanted bounce back. Our C-Series enclosures have built in buffer space in the rear; you'll also want approximately 2-4 inches of buffer space away from side walls and ceilings.
- Safe golfing distance away from the screen: For the safety of both the golfer and the screen, we recommend standing a minimum distance of 10 to 12 feet away from the screen.
- Height of the golfer(s)
- Length of the golf club(s)
- Turf thickness, heating ducts, and soffits
- Furniture and access to doorways
For complete guidelines on proper spacing for a golf simulator, check out our article 'Measuring Your Space for an Indoor Golf Simulator'.
When will my enclosure ship?
Our golf enclosure kits are made to order (which is why we can customize them down to the inch!). We make sure they are measured, sewn, and packed perfectly before they are ready to ship. Because of that, production lead time may fluctuate based on volume. To see the expected shipping and delivery times, please add the item to your cart and enter your shipping information.
What if the black enclosure material gets hit with a golf ball?
The enclosure material is not designed to take a direct hit from a golf ball. However, if you hit the white impact screen, and it bounces and hits the enclosure, you should not experience any issues.
Can I get a replacement screen for the enclosure?
Yes, please contact Par2Pro for details.
Installation:
What pipes do I need to construct the enclosure kit frame?
Par2Pro only sells Carl's enclosures WITH pipes so that you are ensured to have the right components without the hassle of picking up your own.
How long does it take to assemble the enclosure?
DIY Golf Simulator Enclosure Kits assemble in about an hour, depending on the size. Of course, it goes a bit faster if you have a helper. Here's our assembly video and manual for reference.
Projector Information:
Where and how should I mount my projector?
The projector specifications determine the maximum image size and how far from the screen it will need to be mounted. Check out our screen size calculator to find the best mounting location.
As for how to mount your projector, here are the places to put a golf simulator projector.
-
Mount a projector above your tee or mat.
- Flush-mount to your ceiling in spaces with lower ceilings
- Drop-mount from your ceiling in spaces with higher ceilings
- Frame-mount from your Carl's Place Pro Enclosure
- Place a short-throw projector on the floor inside the golf simulator. Of course, if you floor-mount your projector you must build or buy a protective cover to keep it safe from golf balls and clubs.
**Custom options available – please contact us for more details.
ATTENTION: Carl’s recommends to tee off at least 10’ from the tee position. We recommend this for more experienced users and that a safety area can be created. Use at your own risk. For a safer enclosure, please try our Standard Enclosure or contact us for more details.